Outline of Experiments in this Bootcamp
Jump to section:
- Introduction to the Bootcamp
- Background
- Experimental Overview
- Part 1: Cloning GFP into the pET28b vector
- Part 2: Expression and purification of His6-GFP
- Considerations for future applications and Student Resources
- Student Resources
Introduction to the Bootcamp
Welcome to the Lab Fundamentals Bootcamp!
This Bootcamp is intended to provide undergraduate students with a technical and conceptual knowledge of basic techniques in molecular biology. The experiments and resources in this Bootcamp are designed to introduce students to many of the essential skills and techniques that are used every day in real research labs. The Bootcamp manual includes fundamental protocols for molecular cloning and protein purification, as well as additional resources for students and Bootcamp instructors.
Upon completion of this Bootcamp, students should have a solid foundation in the core techniques of molecular biology and essential skills of general scientific research. Students should feel more comfortable working in a research lab and more confident in their knowledge of these techniques and their fundamental principles.
Background
Fluorescent proteins are a powerful tool in molecular biology that allow us to gain new insights into important biological processes. These proteins absorb light at one wavelength and re-emit light at a longer wavelength, enabling us to see them inside cells. The most famous example of a fluorescent protein is Green Fluorescent Protein (GFP), which was originally isolated from the jellyfish Aequorea victoria. GFP absorbs blue light (~488 nm) and emits green light (~510 nm). We can separate these different wavelengths of light using special instruments, making it easy to detect the presence of GFP and visualize its location in biological samples. This property has made GFP an extremely powerful tool for modern biology, and it is often used to label specific cells in an organism or fused to other proteins to monitor their location within cells.
GFP was originally purified in the early 1960s by Osamo Shimomura from an extract made by manually squeezing ~10,000 jellyfish through cheesecloth. Fortunately, the gene encoding GFP has since been isolated and sequenced, making it possible to easily produce large quantities of the GFP protein in bacteria for biochemical studies. Since the discovery of GFP, scientists have engineered fluorescent proteins with many more colors, and have even discovered some new ones!
Experimental Overview
The goal of this Bootcamp is to clone green fluorescent protein (GFP) fused to a 6X histidine (His6) tag into a plasmid vector for expression in the bacteria Escherichia coli. We will then isolate GFP protein from an E. coli extract using the His6 tag and use different methods to analyze the isolated GFP protein.
Many of the experiments in this course are used in sequence in a research lab to create or modify a desired DNA construct for use in experiments. Because of the time constraints of this course, the protocols we will follow are not all in the same order that you might experience if you were doing a similar project in a lab.
The protocols in this course are divided into two sections: 1) molecular cloning and 2) protein expression, purification, and analysis.
Part 1: Cloning GFP into the pET28b vector
We will use Gibson Assembly to insert GFP into a plasmid vector (pET28b) that can be used to express 6X His-tagged proteins in bacteria. The protocols for this section can be found on the Molecular Cloning Overview page.
There is usually more than one way to make a construct so it’s best to think about the most efficient cloning method in each case. The methods outlined in this course are a great place to start, but there are many factors that will dictate how you approach your cloning projects in the future, such as how you design your primers and what you plan to use the construct for.
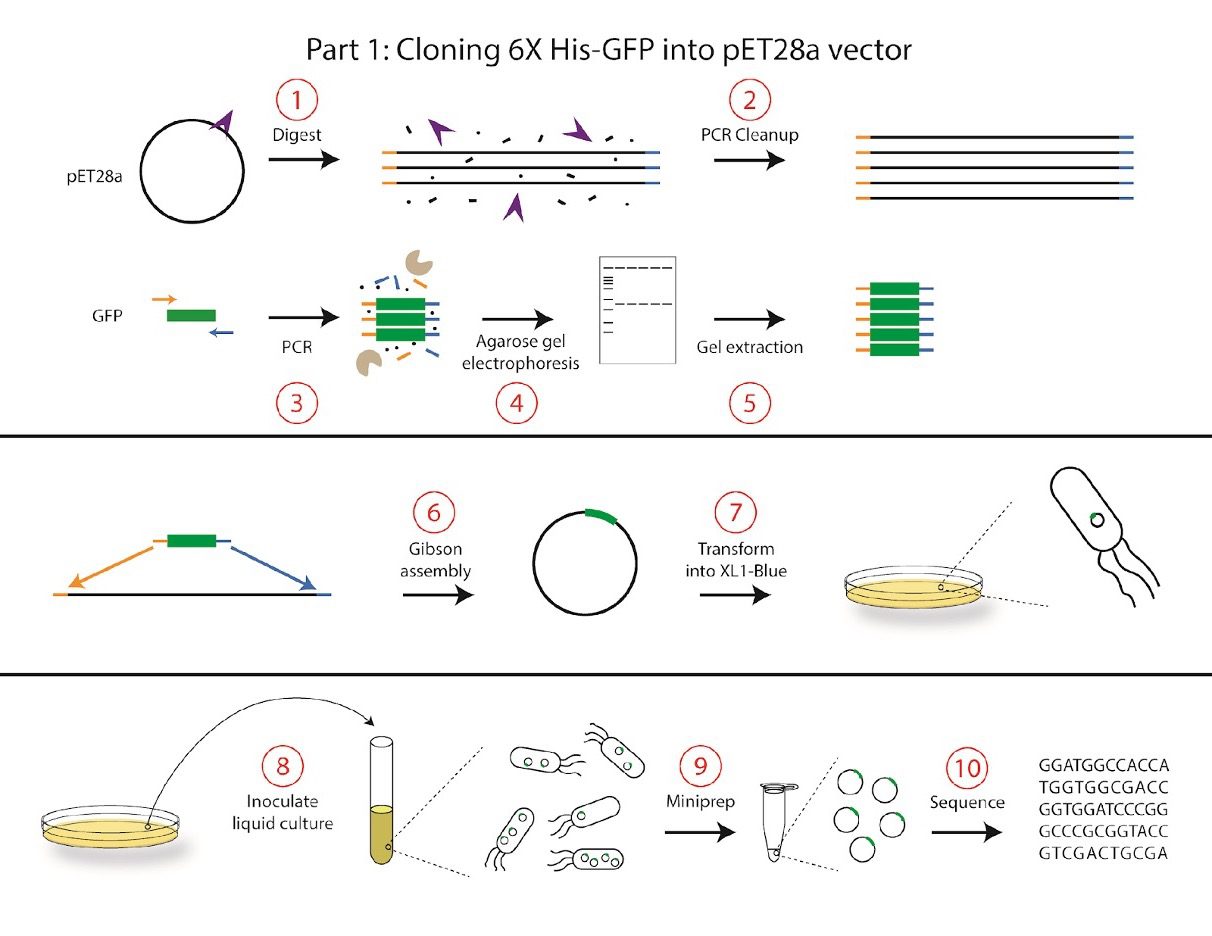
In this course, we will conduct the following protocols to construct the pET28b-GFP plasmid:
- A vector digest will be used to linearize the pET28b vector and create sticky ends for cloning.
- PCR cleanup will be used to remove unwanted components of the digest. The result of the cleanup will be the purified vector consisting of linear pieces of double-stranded DNA.
- PCR will be performed to clone out GFP from Aequorea victoria gDNA. This reaction will also add nucleotides complementary to each end of the vector for cloning.
- The PCR product will be analyzed by agarose gel electrophoresis to confirm the correct size of the DNA product.
- A gel extraction will be used to purify the DNA insert from Step 3. The purified insert consists of linear pieces of double-stranded DNA.
- Gibson assembly will be used to combine the linearized vector and insert DNA into a new plasmid, pET28b-GFP. The two pieces of linear double-stranded DNA (the insert and vector) have complementary sequences flanking each end, and these sequences will be recognized and ligated in the Gibson assembly reaction to form one piece of double-stranded circular DNA containing our pET28b vector and GFP insert.
- The Gibson product will be transformed into a cloning strain of E. coli called XL1-Blue. At the end of the transformation, the plasmid will be incorporated into the E. coli, which will grow into a colony on a plate. We will select for transformed bacteria that carry our pET28b-GFP plasmid by plating on media containing a selective antibiotic specific to our plasmid.
- A single colony will be used to inoculate a liquid culture that will be grown overnight to increase the number of bacterial cells (and thus plasmid yield). Each colony on the plate originated from a single bacterium that was transformed with the plasmid, and thus each colony should be genetically identical.
- Plasmid DNA will be extracted from the cells using a miniprep plasmid purification method.
- The plasmid will be sequenced to ensure that the insert was properly incorporated into the vector and that no mutations arose during the digest, PCR amplification, or Gibson assembly steps.
Part 2: Expression and purification of His6-GFP
The pET28b-GFP construct we made in Part 1 contains an IPTG-inducible GFP protein with a 6X His tag. The protocols for this section can be found on the Protein Expression, Purification, and Analysis Overview page.
Expressing 6X His-GFP in E. coli requires a properly constructed plasmid. In an actual research project, completion of Part 1 is necessary before starting any of the steps outlined here. For the purposes of this class, we have already constructed the pET28b-GFP plasmid and transformed it into a protein expression strain of E. coli called BL21 DE3.

We will start this section by making a liquid culture of BL21 DE3 cells containing the plasmid that encodes the 6X His-GFP construct.
- Fresh media will be inoculated with a saturated culture of bacterial cells containing the pET28b-GFP construct. The volume of this culture will depend on the scale of your purification.
- At the proper time during growth, IPTG will be added to induce the expression of the 6X His-GFP protein.
- After inducing with IPTG, we will harvest the cells and freeze the cell pellet until we are ready to purify our protein.
- We will purify the 6X His-tagged GFP by affinity chromatography. At the end of the purification, we should have a solution that contains a high concentration of the pure 6X His-GFP protein.
- A bicinchoninic acid (BCA) assay will be used to assess the quantity of the purified protein product.
- SDS-PAGE will be used to separate proteins for analysis by size. Coomassie staining will allow for visualization of the separated proteins to analyze the quality of the purified protein product.
- We will assess the acid tolerance of the purified GFP protein by putting it into increasingly acidic buffers. This will enable us to assess the ability of GFP to withstand acidic environments.
Considerations for future applications and Student Resources
From here, experiments will vary based on individual research interests. Purified proteins are often used in biochemical assays to determine their functions or crystallized to determine their structure. What we do with a purified protein depends on the particular research questions, techniques available, and the properties of the protein.
The lectures and protocols in this course touch on some of the technical aspects of the assays you might do. As you will see through reading scientific literature and discussing with your research mentors, the specific assays you will use will need to be tailored to the specific questions you want to ask.
Student Resources
Jumping into a bustling research setting can be intimidating at first, but it doesn’t need to be. For help navigating the unique challenges of the research environment, and for appendices to the Bootcamp manual, please visit the Student Resources page.