Jump to section:
Key Concepts
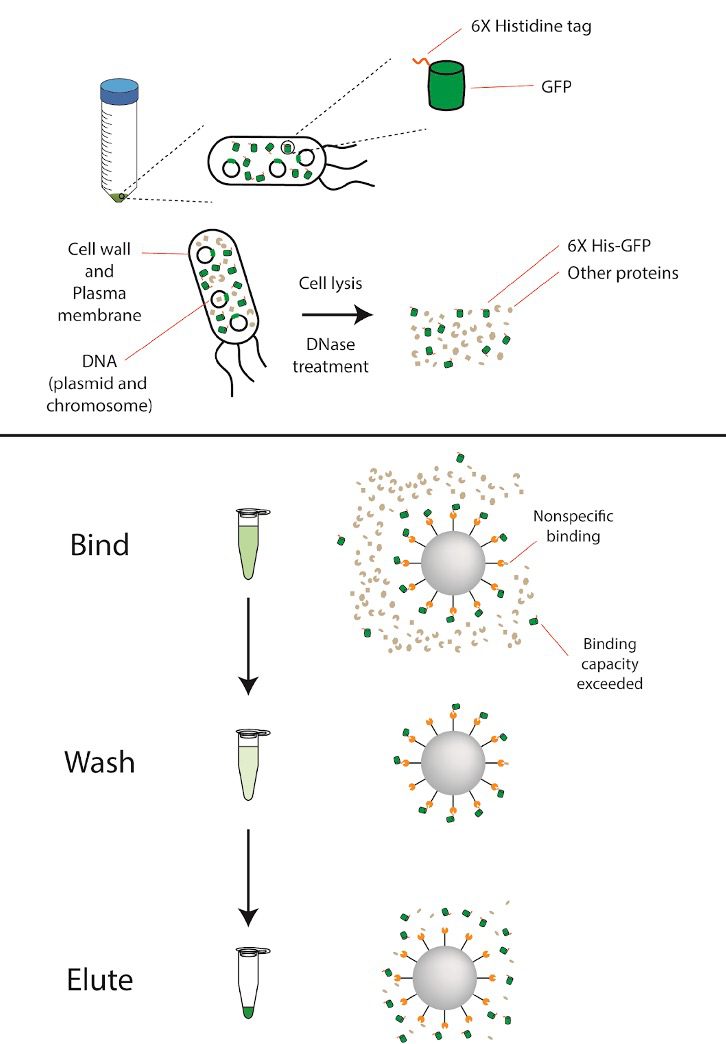
Proteins with a hexa-histidine (His6) affinity tag at either their N- or C-terminus can be purified using nickel-based affinity chromatography. The His6 tag binds to metal ions like nickel (Ni2+), allowing us to separate our His6-GFP from all the other proteins in the cell. You will be given a frozen cell pellet of bacteria cells that were induced to express His6-GFP. After lysing the cells to release the protein, we will first run a nickel column to extract the His6-tagged protein. We will run an SDS-PAGE gel to assess the purity of our His6-GFP protein.
Materials
- Cell pellet from 50mL E. coli cells expressing His6-GFP
- 200µL Ni-NTA agarose (in 2mL tube)
- 1.5mL microcentrifuge tubes
- 2mL microcentrifuge tubes
- 2 mL BPERII lysis buffer
- 1 µl lysozyme
- 1 µl DNase I enzyme
- 3 mL Wash buffer
- 1 mL Elution buffer
- 1 mL Regeneration buffer
Procedure
Lysis:
- Add 2mL of the BPERII lysis buffer to the cell pellet. Resuspend cells by pipetting up and down, making sure that no chunks remain.
- Add 1µl of lysozyme and 1ul of DNase I. Lysozyme helps break down bacterial cell walls and DNase I degrades unwanted DNA from bacterial lysis to assist with protein purification.
- Incubate at room temperature 15 minutes.
Separate cell debris from lysate:
- Take your lysate and split it into two separate 1.5mL tubes, 1mL in each.
- Spin lysate in centrifuge at maximum speed for 5 minutes. While this is spinning, equilibrate your Ni-NTA agarose beads:
- Add 500µL water to the 200µL bead slurry (Ni-NTA Agarose) and pipette gently to mix.
- Settle the resin by centrifuging at 800g for 1 minute.
- Aspirate (remove with a pipette) and discard the supernatant. Be careful to not disturb the bead bed.
- Add 500µL of wash buffer to the bead slurry and pipette gently to mix.
- Settle the resin by centrifuging at 800g for 1 minute.
- Aspirate and discard the supernatant. Be careful to not disturb the bead bed.
- Transfer 50µL of the supernatant from one of the tubes to a clean 1.5mL tube and label “Clarified Lysate” (“CL” for short). Set this sample aside. You will run it on a gel for analysis.
- Carefully remove remaining supernatant from both tubes with a pipette (Avoid disturbing any of the pellets!) and transfer the supernatant to a clean 2mL centrifuge tube.
Purifying His6-GFP Protein:
- Add 100μL of Wash buffer to your beads. Pipette gently to mix, and then add this entire slurry to the 2mL microcentrifuge tube with your clarified lysate.
- Incubate at room temperature for at least 10 minutes, inverting the tube every minute or so to resuspend the beads. Longer binding times may result in more effective binding.
- Settle the resin by centrifuging at 800g for 1 minute.
- Transfer 1mL of the supernatant to a clean 1.5mL tube and label “Flow-Through” (“FT” for short). Discard the remaining flow-through. Be careful to not disturb the bead bed.
- Add 1mL of Wash buffer to the bead slurry and invert slowly to mix.
- Settle the resin by centrifuging at 800g for 1 minute.
- Collect the supernatant in a clean 1.5mL tube and label “Wash (W)”. Be careful to not disturb the bead bed.
- Repeat steps 12 – 14. (You do not need to save this second wash).
- Elute by adding 200µL of Elution buffer to the bead slurry with gentle agitation. Incubate for 1 minute at room temperature.
- Settle the resin by centrifuging at 800g for 1 minute.
- Collect the supernatant in a clean 1.5mL tube and label “Elution (E)”.
- Add an additional 200µL of Elution buffer to the bead slurry with gentle agitation. Incubate for 1 minute at room temperature.
- Settle the resin by centrifuging at 800g for 1 minute.
- Combine the supernatant with the previous elution. Save the purified protein at 4°C for future use.
Washing and storing resin (optional):
Centrifuge and discard the supernatant between the following rinses:
- Rinse resin with remaining Elution buffer.
- Rinse resin with 1 mL Wash buffer.
- Rinse resin with 1 mL water.
- Rinse resin with 1 mL of Regeneration buffer.
- Rinse resin with 1 mL of water.
- Centrifuge and discard the supernatant. The resin is now regenerated.
- Add 200μL 20% EtOH, and resuspend resin.
- Transfer resin to the indicated 15mL conical. Instructors will collect and save the resin for future use.
Preliminary analysis of fractions:
GFP can be detected visually by its green color by eye. You might notice that your purified protein has a yellow-green hue. However, a more sensitive way to assess the presence of GFP can be done using the inherent fluorescent properties of the protein. The SafeImager light overlaps with the excitation wavelength of GFP. Use the SafeImager to detect the presence or absence of GFP in the lysate, flow-through, washes, and elution. The samples will fluoresce if GFP is present.
Buffer Recipes:
Wash Buffer
- 20mM Tris pH 8.0
- 500mM NaCl
- 20mM Imidazole
Nickel Column Elution Buffer
- 20mM Tris pH 8.0
- 500mM NaCl
- 500mM Imidazole
Imidazole is used to elute the tagged proteins bound to nickel ions attached to the surface of beads in the chromatography column. An excess of imidazole is passed through the column, which displaces the His6-tag from nickel coordination, freeing the His6-tagged proteins.
Resin Regeneration Buffer 100mM Sodium Acetate, pH 4.5