Jump to section:
Key Concepts
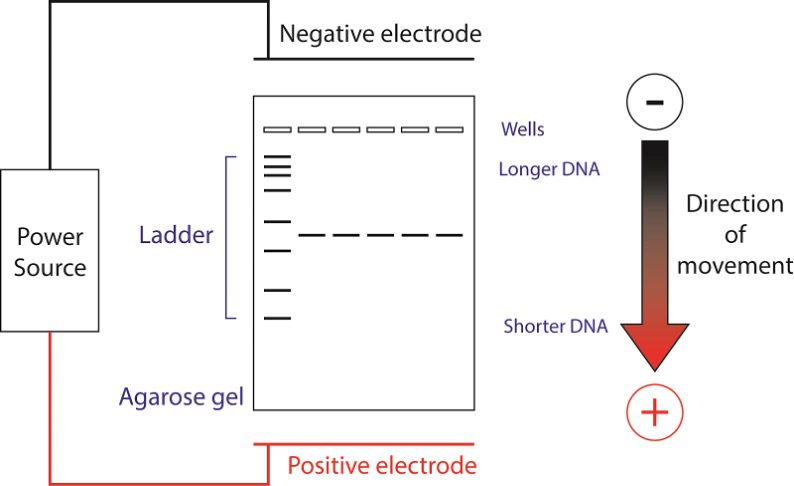
Gel electrophoresis is a technique used to separate molecules based on their size and/or charge. Agarose gels can separate different length pieces of DNA, due to pores formed by agarose. These pores are of the appropriate size to separate DNA of a few hundred to several thousand bases. Here, we will pour and run a 1% agarose gel for three purposes:
- To confirm the generation of the desired PCR product for the GFP insert.
- Verify that the vector has been linearized for the Gibson Assembly.
- Purify the proper GFP DNA fragment for the Gibson Assembly.
Materials
- Electrophoresis grade agarose
- 1X TAE buffer
- 250ml Erlenmeyer flask
- Sybr safe DNA gel stain (10,000X stock)
- DNA samples (from insert PCR & vector digest)
- DNA loading dye (6X)
Procedure
Safety Note: In order to make the gel, we are going to use a microwave to boil the buffer and agarose. Be careful when handling hot glassware. Always use a heat-protective glove!
Pouring the gel:
- In a 250ml Erlenmeyer flask, combine enough 1X TAE and agarose for 60 mL of 1% w/v agarose (1% w/v means the solution contains 1 g solute per 100 mL solvent). Stuff the top with a Kimwipe to minimize vaporization of the buffer in the microwave.
- Microwave the 1% agarose until it starts boiling (start with 1 min, but keep an eye on it!)
- Once it has begun to boil, take it out and mix by swirling gently. Use an insulated glove to handle the flask. CAREFUL, IT’S HOT! Look for the appearance of little globs of agarose (shooting stars) in the solution. If you see them, return the flask to the microwave, bring to a boil again, and gently mix. The agarose solution is ready when the solution is clear and all the agarose has melted.
- Set the agarose solution on the bench to cool briefly before pouring.
- Set up your gel caster (be sure to include the appropriate comb).
- Wait about 5-10 min for the flask to be cool enough to handle.
- Add 6 µL of 10,000X SybrSafe to the warm 1% agarose solution and mix by swirling gently.
- Note: Many labs use ethidium bromide to stain DNA gels. Ethidium bromide is a carcinogen, and special care must be taken when using it. Be sure to familiarize yourself with your lab’s gel staining procedures because ethidium bromide-containing gels need to be treated as hazardous waste.
- Pour the solution into the gel caster, filling it to just below the top of the teeth of the comb
- Pour any leftover agarose into the marked container for disposal.
- Wait for ~30 minutes until the agarose has cooled. The gel is ready to run when it is no longer transparent and has become firm to the touch (poke the gel gently to avoid damaging it). You can leave the gel to cool for longer if necessary.
Running the gel:
- Carefully remove the gel from the gel caster and place it in the gel running apparatus with the comb nearest the negative (black) electrode.
- Pour 1X TAE in the gel box until it just covers the top of the gel and the wells of the gel are filled with buffer.
- Slowly remove the comb from the gel; pull straight up to ensure that removing the comb does not damage the wells.
- To each of your samples, add 6X DNA loading dye so the final loading buffer concentration is 1X. (e.g. 50 µL of the PCR reaction + 10 µL DNA loading dye)
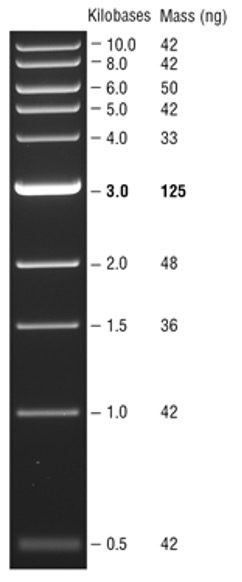
- Carefully pipette 10 µL of the ladder into a selected well of the gel.
- Note: There is glycerol and dye in loading buffers so you can watch your sample sink into the well, but you will lose your sample if you pipette too fast or damage the well with your pipette tip. It can be helpful to steady your pipetting arm by placing your elbow on the bench and holding the pipette steady with your off hand.
- Slowly and carefully pipette your samples with loading dye into their own wells.
- Put the lid to the gel box on; make certain that the electrodes are appropriately aligned. DNA is negatively charged and will run away from the negative (black) electrode and toward the positive (red) electrode. Thus, be sure that the wells of the gel are closest to the black electrode.
- Turn on the power supply and check that bubbles are rising from the wire in the gel box. Run the gel on 120V for ~30 min.
Imaging your gel:
- Remove your gel and put it on the light box.
- Note: We use SybrSafe to visualize the DNA and illuminate with visible light so you don’t need to worry about exposure. Many labs use UV light, which is carcinogenic (and you do need to worry about exposure). Be sure to check with people in your lab before using the light box and make sure you are equipped with the appropriate PPE and training to use it.
- Look at the ladder to determine the size of your band(s) using the 1kb DNA ladder on the right. The expected size of the GFP PCR band is ~ 800 bp.
- Record the size and relative intensity of your gel bands in your lab notebook.